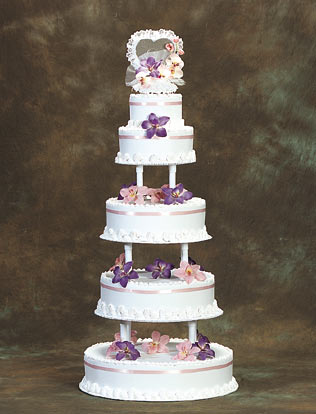
Wedding Cake Instructions for Tropical Paradise
 Wedding Cake Decorating Wedding Cake Decorating
Everything you need to get to the top fast.Everything you need to create beautiful wedding cakes. Each style has been designed for fast and easy decorating while
offering tasteful elegance.
Before you start:
Using your favorite recipes bake, fill and assemble a 18 inch, 14 inch, 12 inch,
9 inch and 6 inch cake.
Take four of the included White Columns and, using a saw or serrated knife,
cut them down to the height of your 9 inch tier.
16 inch Cake
- Take four of the included White Columns and attach them to a 14 inch tier plate. Please refer to
the cake stand assembling instructions.
- Ice cake.
- Wrap ribbon around upper edge of cake.
- For top border, pipe a reverse shell border with a 18 pastry tip.
- For bottom border, alternate between a shell and a C border using pastry
tip pt-3b, as shown in picture.
- Take the tier plate and columns you used in step 1 and push through to the bottom of the cake using
the holes that you have previously made.
- Pipe around the bottoms of the columns using pastry tip 18.
14 inch Cake
- Take four of the included White Columns and attach them to a 12 inch tier plate. Please refer to
the cake stand assembling instructions.
- Ice cake.
- Wrap ribbon around upper edge of cake.
- For top border, pipe a reverse shell border with a 18 pastry tip.
- For bottom border, alternate between a shell and a C border using pastry
tip pt-3b, as shown in picture.
- Take the tier plate and columns you used in step 1 and push through to the bottom of the cake using
the holes that you have previously made.
- Pipe around the bottoms of the columns using pastry tip 18.
 12 inch Cake 12 inch Cake
- Take four of the included White Columns and attach them to a 9 inch tier plate. Please refer to
the cake stand assembling instructions.
- Ice cake.
- Wrap ribbon around upper edge of cake.
- For top border, pipe a reverse shell border with a 18 pastry tip.
- For bottom border, alternate between a shell and a C border using pastry
tip pt-3b, as shown in picture.
- Take the tier plate and columns you used in step 1 and push through to the bottom of the cake, using
the holes that you have previously made.
- Pipe around the bottoms of the columns using pastry tip 18.
9 inch Cake
- Take the four White Columns that you have already cut down to the height of
your 9 inch cake and attach them to a 6 inch tier plate. Please refer to
the cake stand assembling instructions.
- Ice cake.
- Wrap ribbon around upper edge of cake.
- For top border, pipe a reverse shell border with a 18 pastry tip.
- For bottom border, alternate between a shell and a C border using pastry
tip 863(3FT), as shown in picture.
- Take the tier plate and columns you used in step 1 and push through to the bottom of the cake using
the holes that you have previously made.
6 inch Cake
- Ice cake.
- Wrap ribbon around upper edge of cake.
- For top border, pipe a reverse shell border with a 18 pastry tip.
- For bottom border, alternate between a shell and a C border using pastry
tip pt-3b, as shown in picture.
Optional Instructions
- Place fresh
flowers or Gum Paste Flowers around columns and in center of tiers
to give a different look
back Tropical Paradise Wedding Cake
next Wedding Cake Instructions for Crystal Rose | |
|

 Wedding Cake Decorating