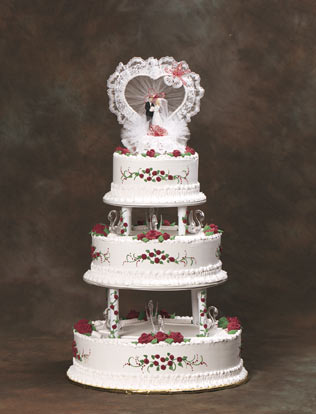
Wedding Cake Instructions for Crimson Fantasy
 Wedding Cake Decorating Wedding Cake Decorating
Everything you need to get to the top fast.Everything you need to create beautiful wedding cakes. Each style has been designed for fast and easy decorating while
offering tasteful elegance.
Before you start:
Using your favorite recipes bake, fill and assemble a 16 inch, 12 inch and 8 inch cake.
16 inch Cake
- Take four of the included White Columns and attach them to a
14 inch tier
plate. Please refer to the cake stand
assembling instructions.
- Ice cake.
- Divide cake into 4 sections.
- For top border, pipe a reverse shell border with a 16 pastry tip.
- Pipe zig-zag arcs on top of cake using pastry tip 16 (see Figure 1).
- Pipe a line on top of zig-zag curve with a 16 pastry tip.
- Pipe string arcs with a 16 pastry tip inside of zig-zag curve.
- Pipe a zig-zag curve about 1 /3 of the way up from the bottom around the side of the cake
using pastry tip 16 as shown in picture.
- Pipe a reverse shell on top of zig-zag with a 16 pastry tip.
- For bottom border, pipe a rosette border using pastry tip 22.
- Using the marks that you have previously made, pipe vines on side of cake
using pastry tip 2 as shown in picture. Pipe rosettes in center of vines with a
16
pastry tip as shown in picture. Add dots with a 2 pastry tip and leaves with a
65 pastry tip.
- Take the tier plate and columns that you used in step 1 and push through to the bottom of the cake,
using the holes that you have previously made.
- Again using the marks that you have previously made, pipe 3 roses at each of the four marks, giving
you a total of 12 roses, using pastry tip 104, and leaves as shown in picture
using pastry tip 65.
- Pipe vines going up each of the four columns with a 2 pastry tip. Add rosettes
using pastry tip 16 and leaves with a 65 pastry tip as shown in picture.
- Place swans behind roses as shown in picture.
12 inch Cake
-
Take four of the included White Columns and, using a saw or serrated knife,
cut them down to the height of your
12 inch cake. Take the four cut White Columns
and attach them to a 10 inch tier plate. Please refer to the cake
stand assembling instructions.
- Ice cake.
- Divide cake into 4 sections.
- For top border, pipe a reverse shell border with a 16 pastry tip.
- Pipe zig-zag arcs on top of cake using pastry tip 16 (see Figure 1).
- Pipe a line on top of zig-zag curve with a 16 pastry tip.
- Pipe a zig-zag curve about 1 /3 of the way up from the bottom around the side of the cake
using pastry tip 16 as shown in picture.
- Pipe a reverse shell on top of zig-zag with a 16 pastry tip.
- For bottom border, pipe a rosette border using pastry tip 22.
- Using the marks that you have previously made, pipe vines on side of cake with a
2
pastry tip as shown in picture. Pipe rosettes in center of vines with a 16
pastry tip as shown in picture. Add dots using pastry tip 2 and leaves with a
65 pastry tip.
- Take the tier plate and columns that you used in step 1 and push through to the bottom of the cake,
using the holes that you have previously made.
- Again using the marks that you have previously made, pipe 3 roses at each of the four marks, giving
you a total of 12 roses, using pastry tip 104, and leaves as shown in picture
using pastry tip 65.
- Pipe vines going up each of the four columns with a 2 pastry tip. Add rosettes
using pastry tip 16 and leaves with a 65 pastry tip as shown in picture.
- Place swans behind roses as shown in picture.
8 inch Cake
- Ice cake.
- Divide cake into 8 sections.
- For top border, pipe a reverse shell border with a 16 pastry tip.
- Pipe a zig-zag curve about 1 /3 of the way up from the bottom around the side of the cake
using pastry tip 16 as shown in picture.
- Pipe a reverse shell on top of zig-zag with a 16 pastry tip.
- For bottom border, pipe a rosette border using pastry tip 22.
- Pipe vines on opposite sides with a 2 pastry tip. Pipe rosettes in center of vines
using pastry tip 16 as shown in picture. Add dots with a 2 pastry tip and leaves
using pastry tip 65 as shown in picture.
- Using the marks that you have previously made, pipe a rose at each mark with a
104
pastry tip and leaves using pastry tip 65.
back Crimson Fantasy Wedding Cake
next Wedding Cake Instructions for Rosebud Dream | |
|

 Wedding Cake Decorating